What is Kafka Streams?
We have already discussed a lot about producers and consumers. We know that we can take a consumer, poll for some messages, transform them, and finally publish the result on another topic.
As simple as it sounds it might get boring to write yet another thread that does the fetching, processing, error handling, and again and again. Not only it is cumbersome, but also error-prone.
Is there a better way? I guess the post title already spoiled a little on the topic 😄. Kafka Streams is a better way, as it is a client-side library to move interaction with Kafka to another level. It is useful when you are facing, both a source and a target system of your data being Kafka.
At first sight, you might spot that the definition of processing in Kafka Streams is surprisingly similar to Stream API from Java. You just use fluent API to specify all the maps and joins. What is more, you do not have to care about the error handling of Kafka consumer or producer, as it is already built-in.
Although it is a feature-rich library able to group, cache or join incoming events, today we will focus on the internals of a simple example taking messages from one topic and putting them to another one.
Our simple app
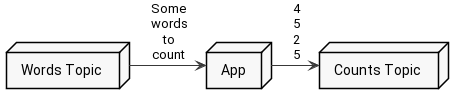
The aforementioned example will fetch records from one topic, count a number of characters in each record, and produce the result to another topic. Fairly simple to start messing around with Kafka Streams.
If you want to check the code by yourself please go ahead and clone the repository with the example available on github.
Without further ado, this is how the crucial part looks in Kotlin:
 1val props = Properties()
 2props[StreamsConfig.APPLICATION_ID_CONFIG] = "count-application"
 3props[StreamsConfig.BOOTSTRAP_SERVERS_CONFIG] = "localhost:9092"
 4props[StreamsConfig.DEFAULT_KEY_SERDE_CLASS_CONFIG] = Serdes.String().javaClass
 5props[StreamsConfig.DEFAULT_VALUE_SERDE_CLASS_CONFIG] = Serdes.String().javaClass
 6
 7createTopic(props)
 8
 9val builder = StreamsBuilder()
10val textLines = builder.stream<String, String>("WordsTopic")
11
12wordsStream
13    .mapValues { message -> message.count() }
14    .to("CountsTopic", Produced.with(Serdes.String(), Serdes.Integer()))
15
16val topology = builder.build()
17
18logger.info { topology.describe() }
19
20val streams = KafkaStreams(topology, props)
21streams.start()
What happens here? Let’s analyze it step by step.
- Line 2 - We are setting an application ID. This is a mandatory parameter. It is used as a base for group id for your consumers, internal topics, and a few other things.
- Line 3 - We are pointing where our Kafka is located.
- Line 4 - 5 - We are setting default serializers. If you do not override serializers or deserializers in a particular method call, then this default class will be used.
- Line 7 - Kafka Streams requires the source topic to be created up-front, otherwise you will get an exception. Thus, we are creating a WordsTopic here. To be honest, there is nothing extraordinary about it, so let’s skip it.
- Line 9 - Get a StreamBuilder instance
- Line 10 - Start creating our first stream! We are pointing where the source of the stream is. In this case, it is a topic called WordsTopic.
- Line 13 - Map the value of every message in the stream to the number of characters in it.
- Line 14 - Order Kafka Streams to send the result to the CountsTopic serializing the key as a string and value as an integer.
- Line 16 - Complete building a stream (topology) for our stream.
- Line 18 - Print built topology for debugging purposes.
- Line 20 - 21 - What we did so far is just set some kind of blueprint describing our processing needs, but here we actually run some threads, start fetching, and processing.
After running this code we can try to send some messages to the WordsTopic and see the result.
So far so good, as you see, our example works fine. It counts the number of characters and outputs it to the CountsTopic. How does it work exactly? First, we need to define our processing topology, and second, we have to start all the processing threads that execute our topology.
Starting with the topology, in our example, we used API called Kafka Streams DSL to define the structure of our processing.
Kafka Streams DSL
All your processing is defined as a graph. The nodes are called stream processors, and every stream processor can accept input records from the upstream, apply processing to them and send the result downstream.
Obviously, there has to be some kind of start and end of the stream. Those nodes are called source processor and sink processor. We have both of them in the sample app, and one is subscribed to the WordsTopic and the second one publishes records to CountsTopic.
Knowing that, let’s revisit the definition of our topology.
 1val builder = StreamsBuilder()
 2val wordsStream = builder.stream<String, String>("WordsTopic")
 3
 4wordsStream
 5    .mapValues { message -> message.count() }
 6    .to("CountsTopic", Produced.with(Serdes.String(), Serdes.Integer()))
 7
 8val topology = builder.build()
 9
10logger.info { topology.describe() }
As you see, lines 4 - 6 define our topology. It should contain 3 nodes
- Source node consuming messages
- Processing node counting characters
- Sink node publishing messages
It would be great if we could check the exact structure of the topology. The good thing is that Kafka Streams allows us to do so. Take a look at line number 10 of this snippet. We are describing our topology there. While working on your topology you can debug the graph you have created using describe method. After you run the sample app you should find in logs this description:
121:51:08.474 [main] INFO  dev.chrzaszcz.kafka.examples.streams.Main - Topologies:
2   Sub-topology: 0
3    Source: KSTREAM-SOURCE-0000000000 (topics: [WordsTopic])
4      --> KSTREAM-MAPVALUES-0000000001
5    Processor: KSTREAM-MAPVALUES-0000000001 (stores: [])
6      --> KSTREAM-SINK-0000000002
7      <-- KSTREAM-SOURCE-0000000000
8    Sink: KSTREAM-SINK-0000000002 (topic: CountsTopic)
9      <-- KSTREAM-MAPVALUES-0000000001
You can note several points from this output:
- Line 3 - We have a source node called KSTREAM-SOURCE-0000000000, and it is subscribed to topic WordsTopic.
- Line 4 - The source node has one child named KSTREAM-MAPVALUES-0000000001, so it forwards all received record directly to this processing node.
- Line 5 - Here is the definition of a processor node KSTREAM-MAPVALUES-0000000001. It is not associated with any store (we do not use stores in this sample, but we will discuss them in future posts).
- Line 6 - Processing node sends his values to the node called KSTREAM-SINK-0000000002.
- Line 7 - Processing node gets his values from the source node KSTREAM-SOURCE-0000000000.
- Line 8 - Here is the definition of the terminal node KSTREAM-SINK-0000000002. You can see that it produces the records to the topic CountsTopic.
- Line 9 - Sink node gets his values from KSTREAM-MAPVALUES-0000000001, which is our processing node.
How to remember the arrow direction? It is similar as in Bash, if you want to send something to your output, use echo "something" > file.txt, however if you want to receive something as an input, use ./cmd.sh < "param".
Processor API
In the aforementioned sample app, we have used Kafka Streams DSL, which is one of two kinds of an interface to configure your topology. The DSL is a high-level interface, with many details hidden underneath. Another interface, however, is a low-level Processor API. It gives you far more grained control over the construction of topology, although, is not so neat and clean as DSL.
If you would dig into the code of Kafka Streams DSL you would conclude that it actually uses Processor API to operate on a topology. To compare both interfaces let’s rewrite our code using other API.
In the repository, next to the previous code there is a ProcessorAPI example.
 1val props = Properties()
 2props[StreamsConfig.APPLICATION_ID_CONFIG] = "count-application"
 3props[StreamsConfig.BOOTSTRAP_SERVERS_CONFIG] = "localhost:9092"
 4props[StreamsConfig.DEFAULT_KEY_SERDE_CLASS_CONFIG] = Serdes.String().javaClass
 5props[StreamsConfig.DEFAULT_VALUE_SERDE_CLASS_CONFIG] = Serdes.String().javaClass
 6
 7createTopic(props)
 8
 9val topology = Topology()
10
11topology.addSource("mySource", "WordsTopic")
12topology.addProcessor("myProcessor", ProcessorSupplier { StringCounter() }, "mySource")
13topology.addSink(
14    "mySink",
15    "CountsTopic",
16    Serdes.String().serializer(),
17    Serdes.Integer().serializer(),
18    "myProcessor"
19)
20
21logger.info { topology.describe() }
22
23val streams = KafkaStreams(topology, props)
24streams.start()
Most of the code is similar, so allow me to highlight the differences
-
Line 9 - Instead of using a StreamsBuilder, we are directly instantiating a Topology
-
Line 11 - We are creating a source node by hand, specifying the name of the node mySource and the source topic WordsTopic
-
Line 12 - Here we are adding our character-counting processor. Pay attention to the parameters, as we specify the node name myProcessor, as well as parent nodes names - in this case, mySource. That is how you specify relationships in the graph. Also, we are setting the operation to perform on each of the records. Here, it is a StringCounter as our custom-made processor with implementation looking like that:
class StringCounter: AbstractProcessor<String, String>() { override fun process(key: String?, value: String?) { context().forward(key, value?.count()) context().commit() } } -
Line 13 - We are adding our terminal node that publishes records to the topic CountsTopic
If we run this example, the behavior is the same, and we are also presented with created topology. The only difference is with the node names since we have changed those.
121:36:59.546 [main] INFO  dev.chrzaszcz.kafka.examples.streams.ProcessorAPI - Topologies:
2   Sub-topology: 0
3    Source: mySource (topics: [WordsTopic])
4      --> myProcessor
5    Processor: myProcessor (stores: [])
6      --> mySink
7      <-- mySource
8    Sink: mySink (topic: CountsTopic)
9      <-- myProcessor
A more complicated topology
We have already tested a simple scenario of sending messages from one topic to another. I think it is beneficial to see a bit more complicated case. We will add another branch to our topology, which will be responsible for detecting an odd number of characters. The output will be 1 if the number of characters is odd, and it will be 0 if the number is even.
The example is in the repo:
 1topology.addSource("mySource", "WordsTopic")
 2
 3topology.addProcessor("myCharacterCounter", ProcessorSupplier { StringCounter() }, "mySource")
 4topology.addProcessor("myOddChecker", ProcessorSupplier { OddChecker() }, "mySource")
 5
 6topology.addSink(
 7    "myCharacterCountSink",
 8    "CountsTopic",
 9    Serdes.String().serializer(),
10    Serdes.Integer().serializer(),
11    "myCharacterCounter"
12)
13
14topology.addSink(
15    "myOddSink",
16    "OddTopic",
17    Serdes.String().serializer(),
18    Serdes.Integer().serializer(),
19    "myOddChecker"
20)
What is different in this case?
- Line 4 - We have added a new processor OddChecker, and connected it to the source node
- Line 14 - Here we create a new sink, that will publish records to the new topic OddTopic. It will receive messages from the OddChecker processor.
Let’s run the application. If we inspect the logs we will see printed topology. Lines 8 and 13 are the newly added nodes.
122:29:39.650 [main] INFO dev.chrzaszcz.kafka.examples.streams.GrandFinale - Topologies:
2 Sub-topology: 0
3 Source: mySource (topics: [WordsTopic])
4 --> myCharacterCounter, myOddChecker
5 Processor: myCharacterCounter (stores: [])
6 --> myCharacterCountSink
7 <-- mySource
8 Processor: myOddChecker (stores: [])
9 --> myOddSink
10 <-- mySource
11 Sink: myCharacterCountSink (topic: CountsTopic)
12 <-- myCharacterCounter
13 Sink: myOddSink (topic: OddTopic)
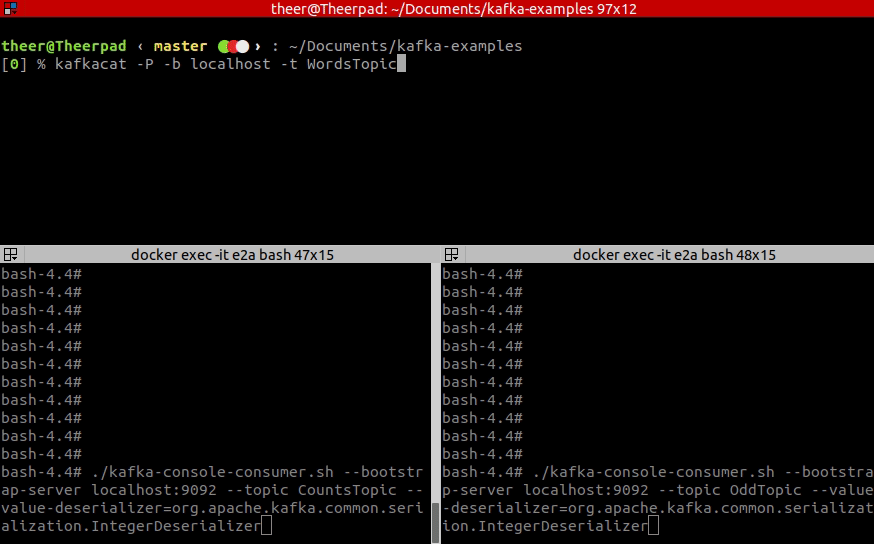
14 <-- myOddCheckerWhen the app is initialized we can try out how it works. For your convenience, here is the GIF. In the top window, I am typing records to the input topic WordsTopic, while the bottom-left window is an output of CountsTopic and bottom-right shows an OddTopic output.
As you see you can define more complicated topologies with many branches, many sources and many sinks. We could also define a few more steps in our processing, depending on the API used, either by introducing another map call, or by injecting processing node between old processing node and sink.
Summary
Even though that was only a quick introduction to Kafka Streams we have touched examples leveraging two different interfaces. We have also played with our topology to make it more complicated and learned how to inspect the topology we built.
Having touched the basics, we are ready to dig into the code of this library in future posts. There is still a long journey ahead of us and for sure we will discover more features like stores, fault-tolerance, replication along with digging into the code and architecture.
Nevertheless, the key points you can take from this post:
-
Kafka Streams is a client-side library
-
You can use two different APIs to configure your streams:
- Kafka Streams DSL - high-level interface with map, join, and many other methods. You design your topology here using fluent API.
- Processing API - low-level interface with greater control, but more verbose code. Here you operate directly on a graph using node names.
-
You do not have to create any threads, as Kafka Streams manages those by itself.
-
You can debug your topology using a describe method and print it to logs
comments powered by Disqus