Every application needs proper tests. We can write them on many levels ranging from unit tests, through integration tests to performance tests. When it comes to integrating our applications with Kafka it is easy to make mistakes and introduce bugs in the code, so it is crucial to write proper tests checking this integration.
To write true integration tests you need a real-life Kafka working somewhere to test how your application cooperates with it. There are many ways you can set up such Kafka for testing. There are solutions like embedded Kafka (for example in spring-kafka-test) that runs broker within the same process as your tests. A different solution is to set up your cluster as a standalone process with custom made scripts. Both of those solutions work just fine, but arguably the easiest, and a most hassle-free solution is testcontainers which run your Kafka for tests in a separate Docker container.
What is Testcontainers? It is a java library that makes it easy to run disposable containers with many common databases like MongoDB, MySQL, as well as services like Elasticsearch and Kafka. It integrates with JUnit so basically, you declare you want a MySQL database and Testcontainers takes care of setting it up and shutting it down after all tests.
Our example
To depict how to test integration with Kafka we will use a simple application that produces events to Kafka. Users of our application want to know if something went wrong and they expect an error to occur when we could not produce their event, so as they can retry the request or handle it any other way.
The code of our example is quite simple:
 1fun fireAndWaitForCommit(value: String) {
 2    logger.info { "Fire and waiting for commit: $value" }
 3
 4    val record = ProducerRecord("topic", "anyKey", value)
 5
 6    val future = kafkaProducer.send(record)
 7
 8    try {
 9        future.get(3, TimeUnit.SECONDS)
10    } catch (e: Exception) {
11        logger.error(e) { "Could not produce event" }
12        throw SendingFailedException(e)
13    }
14}
What is happening here? Let us dissect the code, line by line:
-
Line 4 - We are creating an event which we want to send.
-
Line 6 - We are telling the producer to send the event. The call is asynchronous, therefore the future is returned.
-
Line 9 - Caller of the whole
fireAndWaitForCommitmethod expects us to wait for acknowledgment from Kafka cluster before returning, so we are waiting up to 3 seconds here. -
Line 12 - If something went wrong, especially if there was a timeout, and the producer could not send the event to Kafka, we are throwing
SendingFailedExceptionhere.
We expect this code to either produce an event to Kafka successfully or throw a SendingFailedException if it could not do so. Let us write some tests to check if it works as we expect it to.
Setting up Kafka with Testcontainers
The first thing we want to test is a sunny-day scenario. However, to do this we need a Kafka as stated before. Let us see how the aforementioned Testcontainers fit in such test and how easy it is to set up a disposable Kafka for testing.
Below is our first test suite. Test in this suite checks if the application sent an event to Kafka topic. Let us take a look:
 1class SunnyDayScenarioTest {
 2
 3    private val kafka = KafkaContainer()
 4
 5    private var application: Application? = null
 6
 7    @BeforeEach
 8    fun setup() {
 9        kafka.start()
10    }
11
12    @AfterEach
13    fun cleanup() {
14        application?.close()
15        kafka.stop()
16    }
17
18    @Test
19    fun `should send events to kafka topic`() {
20        // given
21        val application = createApplication(kafka.bootstrapServers)
22        createTopic(kafka.bootstrapServers)
23
24        val event = "anyEventValue"
25        val consumer = createKafkaConsumer(kafka.bootstrapServers)
26
27        application.fireAndWaitForCommit(event)
28
29        // when
30        val events = consumer.poll(Duration.ofSeconds(3)).first()
31
32        // then
33        assertThat(events)
34            .extracting { it.value() }
35            .isEqualTo(event)
36    }
37
38    ...
39}
What is happening here?
-
Line 3 - We are creating
Testcontainers’ Kafka container. -
Line 9 - We are starting container with Kafka
-
Line14-15 - We are shutting down the application and Kafka container to be sure no background threads are left running that might affect other suites.
And for the test itself:
-
Line 21 - We are initializing the application, pointing it to our newly created test Kafka.
-
Line 22 - We are creating the topic on test Kafka.
-
Line 25 - We are creating a Kafka consumer. We will use it to check if the application has sent a proper event to the topic.
-
Line 27 - We are sending an event to Kafka and waiting for a response.
-
Line 30 - We are fetching available events in Kafka.
-
Line 33-35 - We are checking if the first event on a topic is our newly sent event.
When we run this test we get a successful result. Because of the line 9 in the suite, Testcontainers has created a Kafka container. We can see this by issuing docker ps command:

You are probably wondering why two containers have been started? As we can see one container is our Kafka, but the other one is called ryuk. It is a part of Testcontainers. If you have ever read manga series Death Note, the name ryuk might sound familiar, as it is one of the main characters as well as death god (read more if you are interested :).
In Testcontainers ryuk also works as a death god, as it is responsible for cleanup of containers. It might happen that due to some coding errors the temporary containers you have created will not be cleaned up, so Testcontainers will ensure to destroy what it has set up before.
Usually, it is a good idea to leave cleanup entirely to ryuk and set up your containers once for all the test suites. Your tests will be quicker, as they will not need to wait for temporary containers to shutdown and launch between the suites. Keep in mind, however, that the data will be shared between the suites, so it might be harder for you to isolate your tests. It is some sort of tradeoff you have to be aware of.
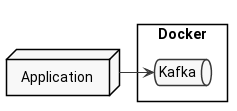
Anyway, having discussed what containers are being set up for our test suite, we can conclude, that our infrastructure looks like this:

Simulating failure cases
Having written a sunny-day scenario test, we should write some failure ones. We know that our application works correctly when Kafka also is up-and-running, but how does it behave when our application cannot reach Kafka?
The question is how we can simulate Kafka’s failure? The obvious solution would be to just shut it down, and it is a fairly good solution. Nevertheless, we can do better! Shutting down Kafka might take some time, setting it up again also takes time. What is more, we might like to test not only a complete Kafka’s failure but some partial failures like network delays.
Fortunately, there is a perfect solution to test network failures. It is called Toxiproxy. It is a software that poses as a proxy between some components of your application and allows you to introduce delays, connection cuts, and more. The marvelous thing about Toxiproxy is that it has its own module in Testcontainers, so it is fairly easy to set it up in Docker along with JUnit tests.
We will use Toxiproxy to cut the connection to Kafka, check the application’s behavior, and restore the connection shortly after.
How to set up Toxiproxy with kafka for our tests? Let us see the code below:
 1companion object {
 2
 3    val network: Network = Network.newNetwork()
 4
 5    val kafka = KafkaContainer()
 6        .withExposedPorts(9093)
 7        .withNetwork(network)
 8
 9    val toxiproxy: ToxiproxyContainer = ToxiproxyContainer()
10        .withNetwork(network)
11
12    lateinit var kafkaProxy: ToxiproxyContainer.ContainerProxy
13
14    private lateinit var application: Application
15
16    @BeforeAll
17    @JvmStatic
18    fun setup() {
19        toxiproxy.start()
20        kafkaProxy = toxiproxy.getProxy(kafka, 9093)
21        kafka.start()
22
23        application = createApplication()
24    }
25
26    @AfterAll
27    @JvmStatic
28    fun cleanup() {
29        application.close()
30    }
31
32    private fun createApplication(): Application {
33        val applicationFactory = ApplicationFactory()
34
35        val kafkaProxyIp = kafkaProxy.containerIpAddress
36        val kafkaProxyPort = kafkaProxy.proxyPort
37
38        return applicationFactory.createApplication("$kafkaProxyIp:$kafkaProxyPort")
39    }
40}
This piece of code contains all the code required to start our containers. What is happening here? Let us find out!
-
Line 3 - 10 - We are creating our containers. This includes both Kafka and Toxiproxy.
-
Line 12 - We are declaring our Kafka proxy, which will be created shortly.
-
Line 18 - 24 - In a setup method, we are first starting
Toxiproxy, creating a proxy to port 9093 of our Kafka container, and starting Kafka. Finally, we are creating an application that will be tested. -
Line 35 - 38 - We are using the proxy’s IP address and port to initialize our application, so it will connect to our Kafka via proxy.
When we launch the test (we will see the test code in a minute), Testcontainers will set up three containers:

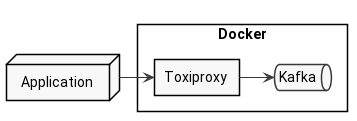
As you see, there is Kafka, as well as Ryuk. However, there is also a separate container for Toxiproxy. Our code connects to this extra container, which in turn routes our requests to the proper Kafka container. Given that, our infrastructure looks like this:

Ok, but how does the test look like?
 1@Test
 2fun `should throw exception when committing failed`() {
 3    // given
 4    val event = "anyEventValue"
 5
 6    // when
 7    assertThatCode { application.fireAndWaitForCommit(event) }
 8        .doesNotThrowAnyException()
 9
10    kafkaProxy.setConnectionCut(true)
11
12    val exception = catchThrowable { application.fireAndWaitForCommit(event) }
13
14    // then
15    assertThat(exception).isInstanceOf(SendingFailedException::class.java)
16}
What does this test do?
-
Line 4 - We are creating any event value
-
Line 7-8 - We are ordering our application to produce an event and expect it to finish successfully.
-
Line 10 - We are simulating Kafka malfunction by cutting the connection to the cluster.
-
Line 12 - Again, we are trying to produce an event to Kafka, but this time it should fail, since we have just cut the connection to it.
-
Line 15 - We are checking if the raised exception is of the proper type.
As you see, we are using Toxiproxy’s setConnectionCut method to terminate the connection between our application and Kafka. We want to achieve this situation:

Ok, so we are ready to run our test and see if it works!
Unfortunately, when we run this test we are welcomed by an assertion error:

Well… that does not look good. This test should have finished successfully. Let us dig in, what is the cause of failure.
Why it does not work?
If we inspect the error, we will see that the problem is an exception being null. We expected our application to raise an exception after failing to publish the event to Kafka. If we dig in even further it appears that the message has been sent to Kafka even though we cut the connection, thus there is no exception as the call finished successfully. Why is that happening? The reason is Kafka’s cluster discovery logic.
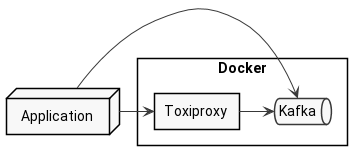
We are providing our proxy’s IP address and port to our Kafka client, however after it makes a first connection to Kafka it will ask for cluster configuration, and will be served hostnames according to ADVERTISED_LISTENERS, which will be set to the Testcontainers’ Kafka container. This way our application omits the proxy, so even though we cut the connection through a proxy it bypasses that cut:

What can we do about ADVERTISED_LISTENERS? Can we somehow change them? Fortunately, we can. Let us find out how!
The first place to jump is the KafkaContainer class which we are using in our test suite. The problem is actually in this class already.
Let us take a closer look at KafkaContainer.java:97:
 1@Override
 2@SneakyThrows
 3protected void containerIsStarting(InspectContainerResponse containerInfo, boolean reused) {
 4    super.containerIsStarting(containerInfo, reused);
 5
 6    ...
 7
 8    String command = "#!/bin/bash \n";
 9    command += "export KAFKA_ZOOKEEPER_CONNECT='" + zookeeperConnect + "'\n";
10    command += "export KAFKA_ADVERTISED_LISTENERS='" + Stream
11        .concat(
12            Stream.of(getBootstrapServers()),
13            containerInfo.getNetworkSettings().getNetworks().values().stream()
14                .map(it -> "BROKER://" + it.getIpAddress() + ":9092")
15        )
16        .collect(Collectors.joining(",")) + "'\n";
17
18    ...
19
20    copyFileToContainer(
21        Transferable.of(command.getBytes(StandardCharsets.UTF_8), 700),
22        STARTER_SCRIPT
23    );
24}
Here testcontainers sets up our Kafka. Starting in line 8, the code is creating startup script that will be injected to the container in line 20. If you take a closer look at line 10 you will spot the KAFKA_ADVERTISED_LISTENERS being set. It calls getBootstrapServers method of the same class which in turn looks like this:
1public String getBootstrapServers() {
2    if (port == PORT_NOT_ASSIGNED) {
3        throw new IllegalStateException("You should start Kafka container first");
4    }
5    return String.format("PLAINTEXT://%s:%s", getHost(), port);
6}
The getHost() method in line 5 returns the host of this container. This means that Kafka advertises itself on its container’s host. So when our producer connects to the Kafka, even though it connects to the Toxiproxy first, it receives the listeners from Kafka and switches to direct connection to Kafka omitting Toxiproxy. That is why the produce call did succeed.
We want to change this behavior. The best way to do it is to create a subclass and override getBootstrapServers method:
 1class ProxyAwareKafkaContainer: KafkaContainer() {
 2
 3    override fun getBootstrapServers(): String {
 4        return String.format(
 5            "PLAINTEXT://%s:%s",
 6            ProxyAwareFailureScenarioTest.kafkaProxy.containerIpAddress,
 7            ProxyAwareFailureScenarioTest.kafkaProxy.proxyPort)
 8    }
 9
10}
Here in lines 6 - 7, we are using the proxy’s IP address and port to serve them as advertised listeners.
Right now we just need to use our ProxyAwareKafkaContainer instead of KafkaContainer in our suite:
 1companion object {
 2
 3    val network: Network = Network.newNetwork()
 4
 5    val kafka = ProxyAwareKafkaContainer()
 6        .withExposedPorts(9093)
 7        .withNetwork(network)
 8
 9    val toxiproxy: ToxiproxyContainer = ToxiproxyContainer()
10        .withNetwork(network)
11
12    lateinit var kafkaProxy: ToxiproxyContainer.ContainerProxy
13
14    ...
15}
Having fixed the suite, let us run the test. As we expected, we finally get a success! We successfully tested that our application throws an exception when Kafka is down.

Summary
We have walked through the examples of testing integration of Kafka in our applications. We have seen how Testcontainers can help us in setting up a disposable Kafka container for our tests. What is more, we have seen how to leverage Toxiproxy to introduce failures in connectivity as it is crucial to test for both successful and failures paths.
I encourage you to try out Testcontainers in your tests, not only for Kafka but for other systems, like MongoDB, PostgreSQL, and more.
Furthermore, be sure to check out Toxiproxy, especially dig into the different toxics it has. We have used only connection cut, but it offers so much more!
You can dig into the examples from this post on my Github repository. You will find three test suites for each the examples:
SunnyDayScenarioTestFailureScenarioTestProxyAwareFailureScenarioTest
Further reading
If you want to read more on technologies we have used today, you can check out the following resources:
-
Toxiproxy - Main
Toxiproxydocumentation. -
Testcontainers - Main
Testcontainersdocumentation. -
Integrating testcontainers with JUnit5 - Documentation about the integration of
TestcontainerswithJUnit5.
Cover photo by Bill Oxford on Unsplash
comments powered by Disqus